CAD design has many uses in industry and private practice. It is heavily used in designing large parts from smaller parts that are designed. The ability to create components and then combine them to make a larger product is essential in understanding how a product as a whole is constructed and operates.
Overview
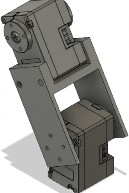
In this tutorial, we will go over the basics of creating an arm based off the XL330 actuator. We will go over setting up the project folder and then adding in the XL330 file and starting creating our whole arm. We will also discuss how to combine different components to make a whole new component. We will then go over how to create joints and rigid groups to make sure the whole arm stays together and move as one single unit.
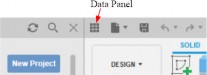
To start off this tutorial, make sure that you create a new project folder to contain all parts that you need. This will include the XL330 model and your arm design. We will only focus on making one portion of the arm since this tutorial is helpful when creating the other links as well. To create a new project folder, open the Data Panel and then select New Project.
From here, go to File>New Design to create your new design file. Save this file with a name of your choosing. Once this is done, right click the XL330 file in the project folder and select Insert into Current Design. This will drop the XL330 Model into the design file you just saved. Your display should like like this:
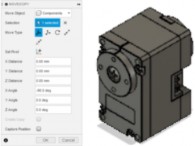
When you see this, select the actuator and rotate it 90 degrees in the Y direction to get it to stand up. Select the actuator and then right click and select Move/Copy to open up the side menu. When you change the X direction, the panel should look like the picture on the next page.
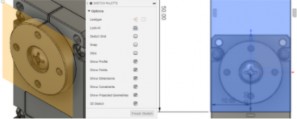
At this point, we build a Construct on the round head of the actuator by selecting Construct at the top of the screen and then select the round face to attach a flat construct to it. We then want to make a sketch on the construct by selecting the construct, then type S and then select 2-Point Rectangle. When making the sketch, make sure that it is a 3D Sketch and give it the dimensions you want by typing those values into the sketch on the screen. To center it on the actuator, while still sketching, type D and then select one of the lengths and set it to the desired value where it covers all 4 holes, then do the same thing for the width to a value where it is centered on the screen. The result of the construct and the sketch will be:
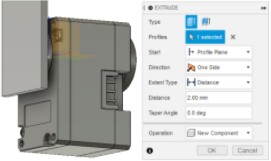
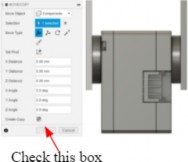
Now that the sketch is done, we need to extrude it. To extrude the sketch, select the sketch and type E. This will bring a menu up to where you can extrude it out to your specifications. You also want to make sure it is a component and not a body. For the purposes of 3D printing, make the extrude thick enough that it can be properly printed. The result will look as such:
You have just made one side of your link. Now we need to make the other side. Using the same method, make the other side of the link on the opposite side of the actuator. The product will look as such:
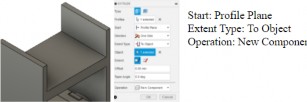
Now we need to make the piece to connect the two links. Near the top of the links, we need to make a sketch on the inside of one link and extrude it to the other. Once this is done, we combine the 2 sides by typing S>Combine and then select the 2 link pieces to create one whole component. The extrusion menu and final product should look like:
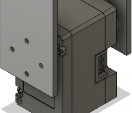
Now we need to create all the holes near the actuator head. For this, select the eye next to your link component and it should disappear. We then need to type S>Point and make 4 points in the center of the 4 holes. Once this is done, make the link visible again, and then make 4 more points directly over top of the ones you just made. This will help us select the center points for our holes. Now, type S>Hole and then start selecting the center points to center the holes. To make the hole the right diameter, select the diameter of the new hole you are making and then select the outside of the hole on the actuator. This made the diameters of the new hole the same size. Your new product will look like:
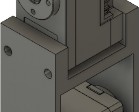
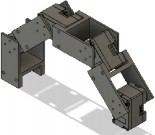
Do the same for the other side. Once this is done, insert another XL330 into your design and move it where it is above the link piece, but not touching. We then follow the same process to make the holes to connect our link to the next actuator. The final result will be on the next page:
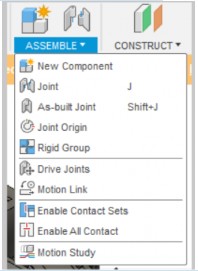
Now we need to make our joints, to do this, go to Assemble at the top of the screen and select As-Built Joint. Once you have done that, select the link and the face of the actuators turn head. When the menu pulls up, change it from Rigid Group to Revolute. The menu below then needs to look like:
You will select the top of the turn head, then the link face, then place your joint in the center of them by hiding the link and lining up the joint at the center of the screw head. Once this is done, we need to make a Rigid Group between the top of the link and the new actuator. Go back to Assemble and select Rigid Group, then select the link and the actuator and hit OK. This makes it to wherever the link moves, so will the new actuator. Finally, go to Assemble, Drive Joint, select the joint you made and change the angle to 30 degrees. The final outcome should look like:
To continue making the arm, you can either copy and paste these parts, or start from scratch and follow the same process with different lengths or parts.
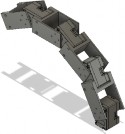
4DOF Arm
For my robot design, I went with the method I described above and implemented it for all the links and actuators. My final design is able to move all together when I adjust the first joint by using the Motion Link. This is under Assemble and is done by linking all of the joints to each other one by one. The way to find this feature is shown below:
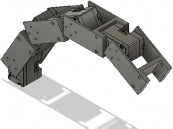
When I did this, I only needed to select the first joint and then adjust it to the desired angle. Once I got this to work, I came up with the tests below. 30 Degree, -30 Degree, 45 Degree, and 0 Degree:
I also set limits by right clicking on each joint and setting the limits to -45 to 45 degrees. The image below shows what happens when I try 90 degrees.
As you can see, it will not update. This is due to the limits preventing it from moving past -45 or 45 degrees. For printing purposes, I would place my links on their side and then have it print where the holes are facing outwards and not straight up and down.