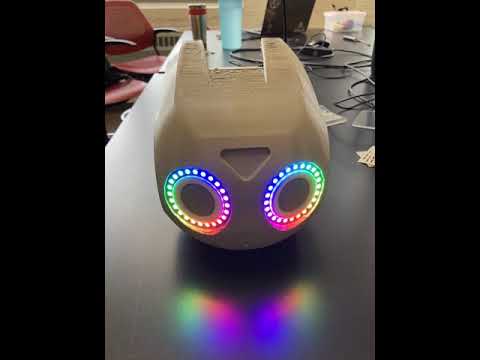
A simple project - took the Darwin Mini head, removed the inside mounts and made space for two Adafruit 24 NeoPixel rings.
Materials:
STL: Robotis Darwin Mini RGB LED Lamp by pyrohmstr - Thingiverse
Microcontroller (any should work): Adafruit GEMMA v2 - Miniature wearable electronic platform : ID 1222 : $9.95 : Adafruit Industries, Unique & fun DIY electronics and kits
Neopixel rings: NeoPixel Ring - 24 x 5050 RGB LED with Integrated Drivers : ID 1586 : $16.95 : Adafruit Industries, Unique & fun DIY electronics and kits
3D printing instructions:
Any large enough printer should work. I would recommend printing in the orientation shown in the video - more supports but better finish on the face. I used PLA and printed it low quality.
I would recommend maybe scaling up 1-2% for tolerance reasons. One of my neopixel rings fit but the other wasn’t close and it turns out their dimensions were different enough to matter. Sanding may be necessary.
I laser cut two rings for the center of the eyes but I don’t have a file for those - should be easy to create if you want that. Originally I was going to use some Optix 95 as a diffuser but didn’t like how it looked. You may like it!
Electronics:
The rings are connected in series to make a 48 LED strip. That is connected to the Gemma. The code is straight forward for the rainbows and uses the Adafruit Neopixel library and demo code. The rainbowCycle function is edited to mirror the rainbow across both rings.
#include <Adafruit_NeoPixel.h>

#define PIN 1

// Parameter 1 = number of pixels in strip
// Parameter 2 = pin number (most are valid)
// Parameter 3 = pixel type flags, add together as needed:
//   NEO_KHZ800  800 KHz bitstream (most NeoPixel products w/WS2812 LEDs)
//   NEO_KHZ400  400 KHz (classic 'v1' (not v2) FLORA pixels, WS2811 drivers)
//   NEO_GRB     Pixels are wired for GRB bitstream (most NeoPixel products)
//   NEO_RGB     Pixels are wired for RGB bitstream (v1 FLORA pixels, not v2)
Adafruit_NeoPixel strip = Adafruit_NeoPixel(48, PIN, NEO_GRB + NEO_KHZ800);

void setup() {
  strip.begin();
  strip.show(); // Initialize all pixels to 'off'
}

void loop() {
  // Some example procedures showing how to display to the pixels:

  rainbowCycle(10);
}

// Slightly different, this makes the rainbow equally distributed throughout
void rainbowCycle(uint8_t wait) {
  uint16_t i, j;

  for(j=0; j<256*5; j++) { // 5 cycles of all colors on wheel
    for(i=0; i< strip.numPixels()/2; i++) {
      strip.setPixelColor(i, Wheel(((i * 256 / (strip.numPixels()/2)) + j) & 255));
      strip.setPixelColor(47-i, Wheel(((i * 256 / (strip.numPixels()/2)) + j) & 255));
    }
    strip.show();
    delay(wait);
  }
}

// Input a value 0 to 255 to get a color value.
// The colours are a transition r - g - b - back to r.
uint32_t Wheel(byte WheelPos) {
  if(WheelPos < 85) {
   return strip.Color(WheelPos * 3, 255 - WheelPos * 3, 0);
  } else if(WheelPos < 170) {
   WheelPos -= 85;
   return strip.Color(255 - WheelPos * 3, 0, WheelPos * 3);
  } else {
   WheelPos -= 170;
   return strip.Color(0, WheelPos * 3, 255 - WheelPos * 3);
  }
}
